
First a definition. Drawer (noun) – One that draws. Property drawers draw properties. We are not talking about that thing in your furniture holding all your nicely folded outfits.
Don’t look at the image at the top of this post. Those are drawers, we are talking about drawers. Wait, don’t tell me. You looked at the image at the top of this post.
Use Case
With that out of the way, we can cover a brief overview of the use case of property drawers. The Unity editor uses a very naive algorithm for generating the UI in the inspector. After all, there are a lot of possible ways you could be making your MonoBehaviours, ScriptableObjects, and Serializable classes and structs. The approach is very flexible, which makes it great as a general purpose implementation for the editor, but sometimes this can result in big, bulky inspectors that are hard to use. This is especially true when using arrays since you need to expand two levels just to see the properties of elements.
Unity’s initial solution to this was Custom Editors. A custom editor is C# code in your project which draws an entire editor window, like Project, Hierarchy, or Console. These editors could also replace the inspector for MonoBehaviour and ScriptableObject classes. This is great when you want your entire class to have a custom inspector.
But what about Serializable classes? They can exist in many MonoBehaviours. In the distant past, if you wanted all MonoBehaviours using a particular serializable class to have a non-default inspector you needed to make a custom editor for each one. This was quite tedious, error prone, and impossible for plugins.
Property Drawers solved all of this. Property drawers enable you to specify how the inspector should look for your serializable classes. This way all MonoBehaviours and ScriptableObjects with fields of your type will have the fancy inspector without having to make a custom editor for every one.
So how do we make one of these? Specifically how do we make one of these using the editor’s old UI framework known as IMGUI short for Immediate Mode GUI? (We will cover using UI Toolkit in another post)
Basic Example
The first time I ever wanted to do this was back before property drawers were a feature, so that’s the example I am going to implement here. I had a list of key value pairs in the unity inspector associating a string to an AudioClip. It was a simple way to store named sound effects as data. Here is the basic data class.
[System.Serializable]
public class NamedAudioClip
{
	public string key;
	public UnityEngine.AudioClip value;
}
Now let’s make a MonoBehaviour using this so we can see it in the inspector.
public class ExampleInspector : UnityEngine.MonoBehaviour
{
	public NamedAudioClip[] sounds = new NamedAudioClip[3];
}
Here’s how this MonoBehaviour looks in the default inspector.
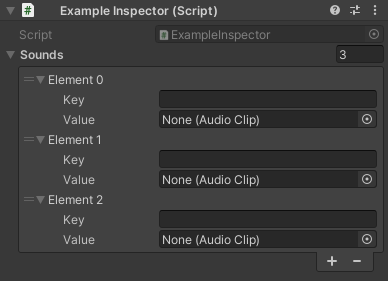
Notice how the fields need expanded and how each one takes up three lines. This is not as convenient as all fields on a single line. We can use a drawer to put all the fields on a single line that doesn’t require expanding every time we want to edit it.
Now let’s make the drawer for the NamedAudioClip class. It is just a C# script inherited from PropertyDrawer and overriding the OnGUI method. This class is an editor script and therefore needs placed inside a folder named Editor (or similarly, inside an arbitrarily named folder with an asmdef excluding runtimes and including the editor).
Another common pattern is to put the editor class in the same file it applies to, but place it inside
#if UNITY_EDITORpreprocessor conditionals. I won’t be doing that here for the sake of clarity.
using UnityEditor;
using UnityEngine;

[CustomPropertyDrawer(typeof(NamedAudioClip))]
public class NamedAudioClipDrawer : PropertyDrawer
{
	private const int ColumnCount = 2;
	private const int GapSize = 4;
	private const int GapCount = ColumnCount - 1;

	public override void OnGUI(Rect position, SerializedProperty property, GUIContent label)
	{
		EditorGUI.BeginProperty(position, label, property);

		var x = position.x;
		var y = position.y;
		var width = (position.width - GapCount * GapSize) / ColumnCount;
		var height = EditorGUIUtility.singleLineHeight;
		var offset = width + GapSize;
		EditorGUI.PropertyField(new Rect(x, y, width, height), property.FindPropertyRelative("key"), GUIContent.none);
		EditorGUI.PropertyField(new Rect(x + offset, y, width, height), property.FindPropertyRelative("value"), GUIContent.none);

		EditorGUI.EndProperty();
	}
}
This uses a general column based approach to making two columns using some simple math. You can use the same logic to make any number of columns by changing the ColumnCount constant at the top of the class. After the math for calculating column sizes, it puts the fields in each column. The first field, for key, ends up being a string field. The second, for value, ends up being an AudioClip field. Here is a screenshot.
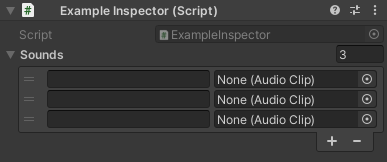
This setup works great for an array of instances which can then be queried for particular values. It is much easier to work with in an array versus the expanded form without a drawer seen above. When a list like this grows it will be easier to manage since you no longer need to expand each item, and more fit on screen. The additional advantage of Property Drawers is that now, every use of this class will also get this new inspector. If you put another of the NamedAudioClip in a different class, it will look the same without you having to make a custom editor for that class.
In an upcoming post I will demonstrate the same property drawer using the new UI Toolkit in the Unity editor. It is the preferred way of building UI going forward.